At the end of last year, I made this chessboard as a Christmas gift for my girlfriend Sarah's parents and am very pleased with how it turned out. It was a great way to work with some new materials as well as to practice very precise laminations. For the individual pieces, I milled various basswood blanks, which Sarah then used to cut various profiles, followed by staining half to create a light and dark set.
Materials & Initial Challenges
One of the initial challenges I faced was choosing material that was economical as well as practical to use. The ideal way to make a solid wood chessboard would be to purchase two species of wood at 8/4 thickness; one light and one dark (such as Hard Maple and Black Walnut) and then mill to a large final thickness (such as 1 1/2" in this case).
The two issues here are: first, that Hard Maple and Black Walnut are quite costly, and second, that purchasing 8/4 stock would result in lots of extra material after the build. I decided instead to purchase 4/4 material that I crosscut in half and laminated to be as thick as 8/4 material, allowing me to mill to 1 1/2" thickness with minimal waste.
 |
| Laminating 4/4 Boards Together to Make 8/4 Boards |
I decided to use Ambrosia (a 'soft' Maple) for the light squares, and torrefied Poplar for the dark squares - both which look very similar to Hard Maple and Black Walnut, but can be purchased at less than half the cost per board foot.
Once my stock was prepared, I planed the boards over-thick then ripped into slightly over-width pieces. By ripping the strips over-width I can finish them off using the time-saver, which also helps to sand away any markings or imperfections the rip-blade may have left (ensuring no gaps between the pieces during the glue-up).
 |
| Using the Time-Saver to Sand the Edges (Left) Laminating the Pieces Together (Right) |
After assembling with alternating light and dark pieces, I waited about 2 hours for the assembly to dry before passing it through the time-saver until it was flat. Then, I squared one end of the assembly, and began cutting cross-grain strips using the same technique as before - cutting over-width then sanding to final size.
 |
| Sanding Flat (Left) and Cutting the Cross-Grain Strips (Right) |
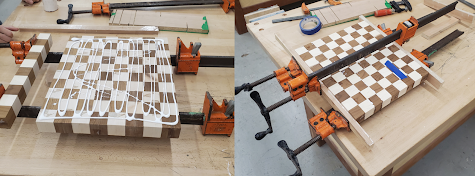
To get a precisely aligned final lamination, I used F-clamps and a long caul to square the chessboard on the shifting edge (where the ends of the pieces were), then locking the assembly into place by tightening the larger bar clamps. After drying, I passed the assembly through the time-saver to reach the final thickness, then cut the chessboard to size and rounded over the edges with a trim router.


No comments:
Post a Comment