As part of a kitchen cabinetmaking module, my class collaborated to build and install this kitchen for one our school's caretakers, Frank.
Prior to this project, we had made a lot of free-standing furniture, so being able to install in an existing space made this a very interesting project. Notably, having to account for uneven floors and irregular walls during the installation required us to build in ways that left tolerances for various imperfections in the space.
Building the Cabinets: The Benefits of Melamine
There's about 20 of us in the class, so in groups of 2-3 students we each built 1-2 cabinets. We used white melamine particle board for the carcasses and wood-grain melamine particle board for the doors.
Melamine is an excellent material for
institutional projects like a school break-room kitchen because it can be ordered in 4' x 8' sheets that have pre-finished surfaces. The cabinets can thus be produced very quickly, especially when using a CNC as we did where multiple components (including their joinery and shelf pin holes) can be cut away from a sheet in just minutes. Melamine is also a very easy to clean surface with just water and a rag, making it convenient for often used, shared spaces.
 |
| Using the Edge Banding Machine to Hide the Raw Edges |
 |
| Cabinet Assembly (Dominoes Used in Joinery) |
 |
| Plastic Laminate Countertop that We Made Prior to the Cabinets |
Mock-Up Installation
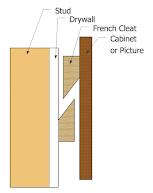
The installation was in 2 stages: a mock-up in the shop, and the final on-site installation in the caretakers' break-room. There are many ways to hang kitchen cabinets, such as a suspension rail system (what IKEA kitchens use), metal z-clips, or in our case, using wooden French Cleats.
 |
| French Cleats Diagram From 'Home Construction Improvement' |
Our installation began with screwing the cleats onto the walls using a laser level for alignment. Afterwards we began to hang the lower cabinets, followed by the upper set. The lower cabinets have adjustable feet to compensate for uneven levels in the floor, while on the upper cabinets, we can adjust the location of the cleats, or physically move and clamp them together to make sure everything is aligned.
Once everything goes together in our mock-up installation, we screw the cabinets together so that when reassembling on-site, they will go back together square. This is important because even though the cabinet doors fully cover the cabinets and are adjustable, small changes in cabinet height will compound as more cabinets are lined up, ultimately being greater than the range of the door hinge's adjustment if things aren't aligned beforehand.
 |
| Mock-up Installation |
On-Site Installation
 |
| Filler Strips Diagram From 'The Journal of Light Construction' |
To account for this, we planned to leave extra space between the cabinets and the walls, and made extra-wide filler strips to manage this gap. On-site, we used a block and pencil to scribe the contour of the wall onto the filler strip, then used a hand plane to shave off material down to our line so that the they produced a clean fit.
A similar gap appears between the countertop and the wall, so we followed the scribe and hand-plane method once more. Any remaining gap was sufficiently covered by the backsplash we installed.
 |
| Completed Kitchen |


No comments:
Post a Comment